
If you are already familiar with Adobe Bridge or Lightroom, then you can use either of these to rename your files and this guide will let you know how.
Bridge and Lightroom are great for simple naming adjustments and allow you to see the images you are renaming, and automatically apply any new names for RAW files to their .XMP counterparts should you have any.
However, if you need to make complex changes to filenames in bulk, the best tool for the job is Bulk Rename Utility (BRU), which can be downloaded for free here.
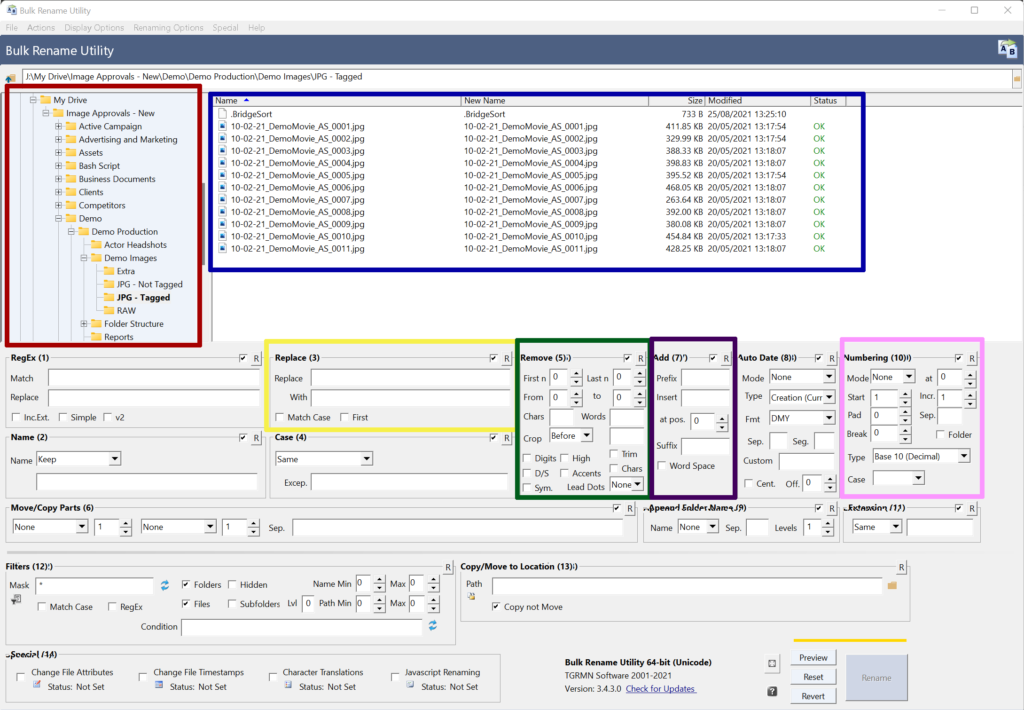
Sure, it’s not the sexiest looking piece of software, but it can help you with your complex filerenaming needs. Here’s a rundown of the sections you’re most likely going to need:
Folder navigation and file list (red and blue).
This section at the top left of the app is your navigation area – select the folder that contains the images you want to rename and this images will then appear listed in the blue highlighted section to the right.
It’s a good idea to extend the first two columns of the file list so that you can see filenames in their entirety. The first column contains your current filenames and the second column is a preview of how they will look once you apply any renaming options you’ve selected below.
Replace (yellow)
This is exactly as straightforward as it sounds. Simply type the characters you want to replace into the Replace field and what you want to replace them with into the With box.
For instance, in the example below, let’s say you want to change the date so that it adds a hyphen in between the numbers to make it easier to read. Simply select the images you wish to apply it to, write the date as it currently appears in the filename in the Replace field and write it how you wish to appear in the with field. The New Name column gives you a preview of how this will look and if you’re happy, click the Rename button at the bottom right of the screen.
Remove (green)
This is a super handy tool and has a few options so let’s run through some of them:
Got lots of filenames with periods (.) in the name that you need to remove? No problem! Simply put a period into the the Chars field. This field will remove all of the characters you type in, no matter where they appear in the filename. And don’t worry! The period that marks the file extension will be untouched!
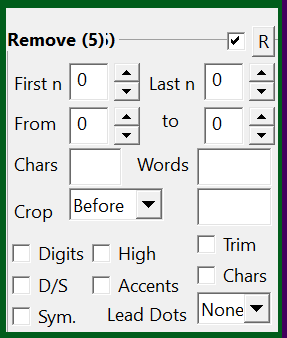
First n means the tool will remove the first number of characters that you type into the box. For instance, putting in the number 5 will make the tool remove the first 5 characters of selected filenames.
Last n is exactly the same but removes from the end of the filename.
And what if you want to remove characters from the middle? No problem! Type in the number of the first and last character in a string that you would like to remove into the From and To fields et voila!
For instance, let’s say you want to change a filename from “220101-BarryCotter-Image-001” to just “220101-Image-001,” then you would put the numbers 8 and 19 into the From and To fields respectively and all characters between the 8th and 19th will be removed.
Add (purple)
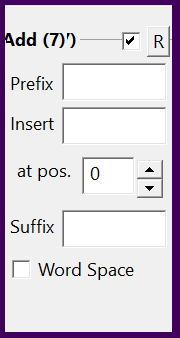
Exactly as it sounds. Type what you want to add to your filenames either in the Prefix box if you want to add it to the start, into the Suffix box if you want to add it to the end, or into the Insert box then type the number of characters into the filename you want to insert it at.
Numbering (pink)
Finally, another tool you are very likely to need to use is the numbering tool. It’s important that images have their own unique number. It’s often best to try and retain the original image filename as provided by the camera wherever possible, however, you should also always try to add a unique sequence number.
Why do we need both? If a photographer is shooting with two cameras then there is a chance that at some point you may start seeing duplicate filenames, and even if they are just shooting with one camera, once the image count gets to 9999 it will reset, and if it’s a big shoot with lots of stills, you’ll soon start seeing repeated numbers!
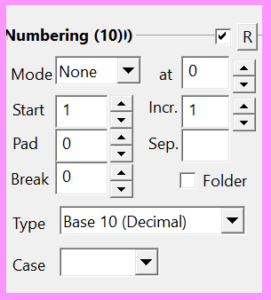
Mode – lets you set where in the filename the numbering starts. If you want it to start somewhere other than the start or end, select insert from the dropdown menu and type the character position number you’d like the numbering to be inserted at in the field next to it.
Start – this is the number you want to start the count from.
Incr. – in what increments do you want the numbering to count (you’ll most likely always leave this set at 1).
Pad – how many digits the numbering should have in terms of zeros at the beginning. For instance, if you want your numbering to be 0001, 0002, and 0010 when you hit double digits and 0100 when you hit triple digits etc, the padding would be set to 3 as this is the number of zeros in front of a single digit number.
We recommend using a padding of 3 as photographers may submit a thousand or more images inside a single folder.
Turning it off and on again.
In the top right corner of each of these tool areas is a checkbox. You can use this to toggle each tool on and off.
Be aware that the tools do not reset each time you rename files so always check you haven’t left a tool on when you come to your next round of name changes.
So now we know how to rename images, but what about why and when?
We strongly advise you to get your photographer to follow these folder structure and filenaming protocols and deliver images to you in this way. Sometimes, however, they may submit images to you with different naming conventions and this can be OK so long as:
- There are no periods (.) in the filename except for the file extension eg .JPG or .DNG etc
- No filenames are ever repeated across different images (there is a very high chance that this will happen if you have more than one photographer, a photographer who shoots with more than one camera, or have a very large number of images).
- The original camera filename is preserved within the new one.
- All formats of the same image have absolutely identical filenames eg the JPG and RAW (including any .XMP) filenames must match exactly.
Issue 1: periods
Periods within a filename mark the start of the image format and lots of software applications can error if they detect periods within a filename other than this. For this reason, be sure to use the Remove tool to eliminate any additional periods.
Issues 2 & 3: unique filenames and the original
An easy way to ensure there are no duplicate filenames for different images is to add unique information to a filename. We recommend adding the date the image was taken, the episode (if TV and known), initials of the photographer and a unique number. If the original image contains the photo’s original camera filename, we also recommend keeping this within the name to act as a reference back to the very original name and as a kind of unique key that never changes, even if the rest of the filename does.
For instance, if you have a day of images with original camera names (usually something like DSC_9879, DSC_9880 etc) we recommend changing them to this:
2022-01-31_101_AS_0001_DSC_9879
2022-01-31_101_AS_0002_DSC_9880
Date_Episode_Initials_UniqueSequenceNumber_OriginalFilename.
You can do this in the following way:
Add:
Prefix “2022-01-31_101_AS_”
Numbering:
Mode: Insert at: 19
Start: 1
Padding: 3
Issue 4: all formats of the same image must have the exact same filename
This means that there should only be one version of each image in each format. If your photographer has supplied you with multiple edits of the same image then you should take extra care to follow the folder structure protocols described here.
Once you have followed this folder structure, make sure every matching image has the same filename, this means you’ll need to use the Remove tool to eliminate additional text the photographer may have added to a filename to identify different edits such as “edit” or “-1” and “-2” etc
What about .XMP files?
If your photographer has made any edits or added any metadata to a native RAW image, this information gets stored as a .XMP file in the same folder as the RAW image it corresponds to. If you rename your RAW files, be sure to rename the XMP files to match.
If you have a large number of XMP files, it is recommended that you use Adobe Bridge or Lightroom to rename your images instead as they will automatically apply the new names to the corresponding XMP files.